Introduction
Why Reiterate?
I wrote Reiterate to help myself improve at League of Legends. League is a complex game and there’s so many little things you have to keep track of. Where’s the enemy? Where is your wave? What objective should you focus next? Answering these questions seems simple in theory, but in an actual game it seemed all my knowledge went out the window. I needed a way to remind myself of all the little tips and tricks a League player should know by instinct. Thus Reiterate was born.
The theory is that Reiterate provides a bridge between the game knowledge you know and the actual game where you need to apply that knowledge. Each player is an individual, and a coaching environment needs to be custom-tailored to the player, focusing on exactly what he or she needs to improve on. Reiterate is a tool to do exactly that.
tldr
The core idea is simple. You record short audio clips to remind yourself what you need to focus on. Then, during a game, Reiterate will play those clips back to you in a random shuffle. When you improve, you can remove the clips that are no longer necessary. When you find new areas you need to work on, you can add new clips to your gaming sessions. Your goal is to reach a point where you’ve internalized all the thought processes that make you a good player.
How to Use the App
Setup
You can record your audio clips with just your iPhone (you don't need a special microphone). When you play back your audio clips during a game, you can have your phone on the table next to your keyboard. If you use headphones while you play, you might want to connect your phone to your PC so you can hear the audio playback from Reiterate mixed in with the game audio. You can do this either through Bluetooth, or by connecting your phone to the aux in audio jack.
Basic Use
The two main screens you will use are the Clips and Play pages. You record and edit your audio clips on the Clips page, then you switch to the Play page to play them back during a game session.
To make a new clip, tap the green Plus button in the lower right corner. Give your clip a short name. Tap the red record button and record a few seconds of audio, then tap the red button again to finish. Try to keep each clip under ten seconds. Tap the playback button to hear your clip. If you don’t like it, you can tap the red button again to re-record it. When a clip is selected, it expands to show details. You can deselect the currently selected clip by tapping the close button on the right.
Once you have a set of clips recorded, switch to the Play screen and tap Start Session. Your clips will play, one at a time, in a random shuffle order. Congratulations, you’re on your way to getting good!
Clip Details
You can edit details on your clips to adjust when and how often they are played. The range slider allows you to set when a clip is played. If you have a clip that should only be played during laning phase (“Try to use the Trading Stance” for example) you can set it to only play during laning phase. The two handles let you set the start and end times for clip playback. As you drag them the text will update to show when the clip will be played.
Below the range slider are three icons which change the playback type. Shuffle is the default and will play the clip at random in its interval, shuffled with every other clip. The metronome icon will set a clip to interval playback. An interval clip will be played at regularly spaced intervals, instead of random times. You can adjust the interval with slider that appears when the metronome icon is selected.
The remaining icon will set a clip to play exactly once. If you want to remind yourself at 20:00 to ward Baron, you can use that setting. A clip set to play once is guaranteed to play at the set time.
Ad Hoc Clips
An Ad Hoc Clip is like a regular Audio Clip, except it is only good for one session. It’s not saved and it will disappear when your session is done.
Ad Hoc Clips are useful for one-time reminders that you think of just before a session. Imagine you get into a game and there is an enemy Jinx and you want to remind yourself to always back when your health is low so Jinx can’t ult you. You can record an ad hoc clip that says “Remember Jinx ult” and have it play for that one game.
Pressing the record button while you are on the Play tab will record an ad hoc clip. You can do it before you start a session, or while a session is in play. If you record an ad hoc clip while a session is playing the current session is muted while you record.
Since you might want to record an ad hoc clip in the middle of a game, the interface is streamlined. All you have to do is tap the red record button once and record your audio. You don't even have to tap it again to stop recording; it will sense when you've stopped speaking.
If you want, you have a couple seconds to adjust the playback settings (make it an interval clip, or adjust the playback range). By default it will play shuffled through the entire session. After a few seconds, the ad hoc recording panel will slide away. You can’t edit the clip after that.
Tags
Tags are a way for you to organize your clips, if you create a large clip library. You don’t have to use tags if you don’t want to.
To add a tag to a clip, tap the  button. If it’s the first time you’re adding a tag, it will prompt you directly. Otherwise, you’ll be taken to the Tag Edit screen. For a clip that already has tags, tapping them will take you to the Tag Edit screen as well.
On the Edit Tags screen you can create, delete, and rename tags. You can also turn them on and off for the audio clip you are currently editing.
Here’s some suggestions for tags. You might want to label some clips “Inspirational” and play them when you are feeling tilted. You can label tags by lane, “Bot”, “Mid”, “Jungle” for example, so that you will only play those clips when you’re playing that position. Perhaps you will have specialized tags for each champion you play, or for when you are going against specific champions (a “vs Shaco” tag)

Use the Tag Bar to filter your clips by tags. The Tag Bar is located above your clips; scroll up all the way to see it. Tap your tags to turn them on and off. When you turn tags off, then any audio clip that doesn’t have at least one tag that’s on will be hidden (except for clips with no tags, they are exempt from filtering). This way you can quickly select a set of audio clips specific to each game.
Swipe left and right in the Tag Bar to turn all tags off and on.
Sessions
Sessions are a way to save sets of audio clips. Instead of turning clips on and off each game, you can save a preselected set of audio clips so that you can for example start a “bot lane Tristana” session.
If you only have a few clips, you don’t need to use sessions. Sessions are useful if you have a lot of clips and you want to swap between different sets of active clips.
By default, you start with one session called “All Clips.” You can edit which clips are in this session by muting them. A muted clip is not counted as part of a session, and it won’t play when you play your session.
To change which clips are muted, tap the Edit button in the upper left. This will reveal a row of muting controls. Tapping the mute control will toggle it on and off. After muting the clips you don’t want to hear, tap Done. The muted clips will no longer be visible, although they have not been deleted. You can tap Edit again and turn them back on.
If you like, you can use this one session to turn clips on and off before each game. But you can also save Sessions. Tap the session name at the top of the Clips window to bring up the Session editor. Tap the Add button at the upper right and enter a name for your new session. Tap Done and you will see your new session name at the top of the Clips list. Now when you edit this session you’ll be setting clips on and off just for your new session. You can go back to the Session list again, and switch to the All Clips session, and you will see all the clips again.
Swipe left on the sessions list to delete a session. Deleting a session doesn’t delete any clips.
Play Tab
The Play tab contains the controls for playing back your session, while you’re in a game.
The large green button shows Start Session / End Session. Start your session just as you load into the rift, so your clips will be synched to the timeline properly. If you forget, you can use the forward and backward buttons to adjust the session time and make it match the game time.
Each clip that plays is listed in a log at the bottom, so you can review them after the game is complete.
Your session will end at your session end time, unless you have “Automatically End Sessions” turned off in the Settings page. In that case, any clips you have set to play “through the end of the session” will continue to play.
Settings
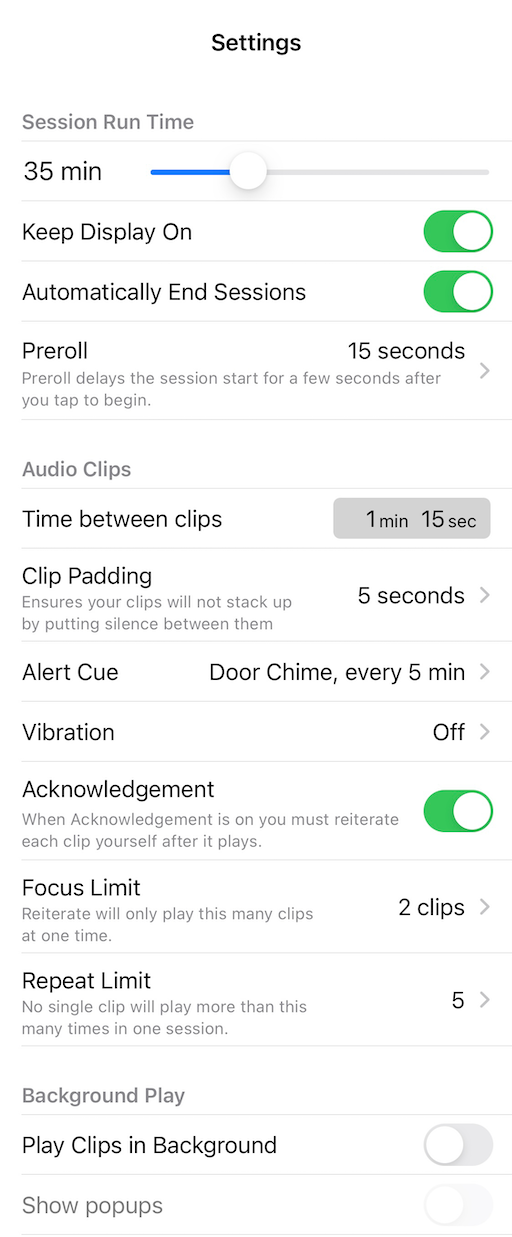
The Settings page contains options that affect all your sessions.
Set the Session Run Time to the average time a game of League lasts. The times in the range sliders are all adjusted relative to this setting.
Keep Display On will prevent your iPhone from sleeping while you are in a session. It’s recommended to keep this on because if your iPhone goes to sleep it won’t play back audio cues.
Automatically End Sessions will stop Reiterate when you get to the end of your game, as set in the Session Run Time. If this is off, then the app will continue to play back audio clips until you tap the End Session button
Preroll adds a delay to the start of your session. Ideally you want to start your session at the same time your game starts. Sometimes, if the game takes a long time to load, you might forget to start your session when the game finally begins. If this is a problem for you, you can set a preroll and then start your Reiterate session while the game is loading.
Adjust the Time Between Clips to set how often you want your random shuffled clips to play. This doesn’t affect your interval-timed clips which have individual frequency settings.
Clip Padding ensures that your clips are spaced out a little when they play back. It's sometimes possible, depending on how you have your clip timings configured, that two or more clips will be scheduled to play at the same time. When this happens, Reiterate will play them in sequence, not on top of each other. Sometimes it can get overwhelming when several clips play in a row, and if that bothers you, you can adjust the Clip Padding. Setting it to 5 seconds, for example, will make sure there is at least that much space between any two clips playing.
The Alert Cue will play a sound before each audio clip. You can turn it off or choose one of the available sounds. For some people who zone out the clips, having a sound play before each one can make you pay more attention.
Turning on Vibration will make your phone buzz as it plays each clip. Like the Alert Cue, this can help you pay attention to each clip as it plays.
Acknowledgement
Acknowledgement is another feature designed to help you overcome autopilot. When acknowledgement is enabled, you must verbally acknowledge each clip as it plays by reiterating it out loud. You can repeat either the recorded audio, or the clip title. This is super effective, and we highly recommend you enable acknowledgement.
When Acknowledgement is enabled, you will see a display of how many clips you successfully acknowledged, after each session. Anything below 20% means you were playing on autopilot, and you need to focus more. Twenty to sixty percent is pretty good, and above 60% means you are well on your way to improving!
Focus Limit and Repeat Limit are two settings that work well with Acknowledgement, although you can use them even if you don't have Acknowledgement enabled. Focus Limit narrows the number of clips that play at any one time. If you have ten clips in your session, but you have Focus Limit set to 2, then only two of those clips will play in any one session.
Repeat Limit makes it so any one clip will only play a certain number of times. Extending the previous example, if you had ten clips with a Focus Limit of 2, and a Repeat Limit of 3, then Reiterate will select two clips and play them each three times, then, if your session is still going, it will pick another two clips and repeat those three times, and so on, until your session ends.
Background Play
When enabled, Reiterate will continue to play your clips even when the app itself is not active. You can start a session, then switch to another app, and your clips will still play. This can be used if you're using Reiterate to train during mobile games.
Show Popups, when enabled, will show the title of each clip as it plays as a notification. You'll briefly see a standard notification pop up as the clip plays.
Get Good with Reiterate
Philosophy
The basic idea behind Reiterate is that there are two different “you”s playing the game. The first “you” is the one that knows how to play the game. He reads all the guides, memorizes cooldowns, and formulates strategy. The second “you” is the one who actually plays the game, forgets everything, and acts like a boosted monkey.
The problem is that these two aspects of yourself aren’t communicating. Under the stress and pressure of an actual game, all the planning and knowledge-gathering you did before seems to get locked away in your brain, and you never use it effectively.
Reiterate is a bridge between the two halves. During game play, it helps your playing-half to focus on the aspects of your game that your strategizing-half knows you need to work on.
There are three steps to this process:
- Discover your weaknesses
- Focus on your weaknesses
- Track and monitor your progress
Discover Your Weaknesses
To improve your game, you first need to isolate the aspects of your game that need improvement.
This is one thing that separates low (Bronze) Elo from middle (Plat). Plat players will generally know exactly what it is they need to work on. Bronze players frequently have no idea why their play is sub-par. Here are some suggestions as to how you can find out what you need to work on, if you don’t have an idea already.
Game replays can provide a wealth of information. Since Riot gave us the ability to replay games right from the client, it’s really easy to do this. Ideally you should replay the game immediately after it’s finished. This will give you a little break, too — taking a break in between games helps keep you off tilt.
When you watch the replay, many things will jump out at you that weren’t at all obvious during the game. That’s part of the Reiterate philosophy. While you were playing the game, you didn’t have time to notice important details. Afterwards, you’ll see things that you can note for your “weaknesses”. Especially take note of every time you die. Were you overextended? Did you stay too long in lane? Did you lose track of the enemy jungler?
If you don’t have time to watch a full replay, you can scan the overview. Go to Profile > Match History > [select a game] > Overview. You’ll see a timeline showing every death in the game, and every objective taken. Review your deaths and try to find the reason behind each one.
Outside the game itself are many other sources of information. Many streamers publish videos on YouTube; search for “lol” + your character to find them. There are also general League videos as well. The Leaguecraft 101 series is one of the best-known and although some of the examples are a little outdated it’s still a great place for a beginning League player to start.
When you’re watching videos, keep an eye out for tips or techniques you don’t yet know and would like to apply to your own game.
The subreddit groups for League of Legends and Summoner School are great places to ask questions.
Reiterate can also work well in conjunction with live coaching. Most coaches will watch a replay of yours and point out things they see that you need to work on. Many times an experienced player can notice errors that you won’t see even when you’re in spectator mode.
Focus on Your Weaknesses
Now you should have a list of things you need to work on. Your next goal is to take each one and turn it into an Audio Clip.
On the Clips tab, create your audio clips one at a time. Try to express each point as succinctly as possible. You want to make short clips, four to six seconds long, that serve to refresh your memory and keep each point in your mind as you play.
Now you can start playing! For the actual game, you will need to decide how many clips you want to play. This will vary for everyone; it’s a matter of taste. Some people are comfortable with a dozen clips all shuffled together, but I think it’s best to work on four or five clips at a time. If you’ve collected dozens of clips in Step One, you might want to organize them into separate sessions and work with one session at a time.
Don’t expect to see results the first game you play. You’re not going to become Challenger overnight. Reiterate is a training app, but it’s training your brain instead of your body. Just like physical training, mental training takes regular practice over many sessions to see results. Don’t get frustrated, even if you think the app is not doing anything for you at all. You may feel like you’re ignoring the app, or that you can’t hear the clips while you’re playing the game, but then you will find after a few games that the audio clips are sinking in subconsciously.
Track and Monitor Your Progress
After you’ve been using the app for a while, you should notice you don’t need some of your clips any more. This is progress! You can mute those clips and enable new ones to work on.
This is your goal. You want to internalize the issues that each clip represents. You will use them in your play without thinking. Once you can do that, then you don’t need that particular clip any more.
You should go back to Step One every so often and find new issues to work on. Always be learning; even the best players have weak points in their game.
Instead of muting or deleting clips that you’ve learned, it’s a good idea to create a session called Review, and store your learned clips there. Every so often you can go back through your review session and touch up your learned skills.
The Review session can also serve as a record of the progress you’ve made. As that list gets longer with each clip you add to it, you can see just how far you’ve come. When you have a list of dozens of learned skills in your Review session, you can feel justifiably proud of your accomplishments. Good work, Summoner!
The Reiterate Shop
Like Custom Skins for your Training
The Reiterate Shop is where you will be able to find Audio Packs with helpful tips recorded by your favorite celebrities and streamers. If you've ever wanted to have a professional esports player coach you while you play, here's your chance!
Reiterate will always be free. There is no functionality locked behind paywalls, and no time limits or subscription fees. Everything you can purchase in the shop is strictly optional.
The first product in the shop is a free Starter Pack for League of Legends. You can buy it if you want to get started right away, without recording any of your own clips. It can give you some ideas on what sort of clips you might want to record for yourself.
To purchase an audio pack, tap the blue button showing the purchase price (or "free"). The purchase works like any other App Store purchase; you will need a credit card on your iTunes account.
Using Purchased Audio Packs
After you purchase an Audio Pack, the clips in that pack will appear in your Clips list along side any other clips you have recorded. They look like ordinary clips and can be used just like your other clips, with two exceptions.
- Purchased clips are marked with a green ribbon in the upper right corner.
- You can't record over a purchased clip
But other than that, you can treat a purchased clip like any other:
- You can mute it if you don't want to hear it.
- You can adjust its playback parameters, making it more or less frequent or changing the time range when it plays back.
- You can assign it to a particular session.
You can also delete purchased audio clips. It won't be gone forever, though. You can restore purchased content by going to the Settings page and tapping the Restore Purchases button. Also, if you upgrade your phone, the Restore Purchases button will copy all your purchased clips to your new phone.
Cheer
Cheer is the currency system you can use inside Reiterate. While you use real-life currency to purchase Audio Packs, Cheer can be purchased and spent to "cheer" for your favorite content.
Cheer can be purchased from the shop in packages of varying amounts, and spent anywhere you see a Cheer icon. When you spend Cheer on an audio clip, that clip's creator gets a share of the proceeds. You can ever cheer for free clips, so you can download a free audio clip, try it out, and if you decide you like it, cheer for it!
You can learn all the details on cheer, including how to buy and spend it, in the Cheer section of the manual.